home about me tutorials business tips ruff ruff shop flickr pinterest twitter facebook
Showing posts with label tutorials. Show all posts

Saturday, July 28, 2012

Screen printing with freezer paper stencils, a tutorial by Ooh Leela!


We prepared this tutorial to share with our friends at Sew Doggy Style, in honor of National Craft for your Local Shelter Day.

Freezer paper stenciling is so freaking addictive! You can use it to print shapes, text, and pretty much anything. Speaking of text, we thought it would be a great idea to add an “ADOPT ME” sign to the bandanas we donated to our local shelter.

Here is what you will need:

Freezer paper (found mine at Safeway)
Exacto knife
Pattern/sign (download here
Fabric paint (I like Tulip fabric paints)
Paintbrush

Cut one 8.5”x11” piece of freezer paper (so you can run it through your printer). Print sign on the dull side of the freezer paper (ignore the shiny side for now). 

 
Using an exacto knife, cut the image out being careful not to cut anything besides just the image. Any cracks or extra cuts in the paper will allow paint to seep through. Be sure to save the inside of the letters A, D, O and P. You will need them too.

Iron the stencil (shiny side down) onto your fabric.


This is where the magic happens. The shiny side becomes sticky with heat. Make sure you iron around all the edges of your stencil, so as to create a good seal. You don’t want paint seeping through. The trick here is to use low heat and make sure that the iron doesn’t touch the shiny side, or else it will lose its sticky-ness. Believe me, been there, done that.

Using a paintbrush, paint over the stencil. Use painter’s tape (like me), if you need to cover any additional areas. It is better to use a light coat of paint. Too much paint will cause the stencil to unstick and you will not get a crisp image. If you end up using more than one coat of paint, make sure you let it dry in between coats.


Let paint dry or if you are impatient like me, get the big gun out: use your blow drier to speed up the process. Oh yeah!!!


When the pain is dry, peel off the freezer paper (like a band-aid). Make sure you heat set your ink, according to the manufacturer’s instructions. **this step is really important otherwise the ink will fade when you wash the bandana.


Voila! The screen printing part of the process is done. Mind you, you can turn this into just about anything. But we decided to turn it into  a bandana, using one of these tutorials.


Oh, and instead of tying the ends, we decided to add a snap.  


Then if you have a cute little baby (no she is not a dog), ask her to model it for you. Warning: treats may be needed. Lots of it.


Got questions? Leave us a comment!

What sort of interesting projects have you been working on lately?


Thursday, July 12, 2012

Business Tips: how to create a blog button using PicMonkey


First and foremost, you will need to figure out how large/small you want your blog button/badge to be. If you are going to display it on your blog, make sure that it is not wider than your sidebar width. I won't get into how to determine the size of your sidebar, because that varies from platform to platform. For the purposes of this tutorial, let's go with what I use on my blog, which is 200x100.

Open PicMonkey. Click on Create a Collage:


Go to layout:


Click on ducks in a row


Choose the 2 cell layout, and delete one of the cells.


Unlock proportions (padlock sign) and enter 200x100.


Click on the color palette to edit the background color. Save file.


Go back to PicMonkey. Click on edit a photo.


Upload the "collage" you have just created. Using PicMonkey's photo editing tools, you can add text, texture, shapes, borders:


And even insert your own picture (click on shapes - see above, then on "YOUR OWN"):


And VOILA: your very own blog button. Both the text and dog paws were created using PicMonkey's tools. I inserted Ooh Leela!'s logo using the "add your own picture" feature.

Can't wait to see what you come up with :)

Wanna add Leela's face to your blog? Use the HTML code below.


Adapted from one of Kelly Designs' original tutorials. Original file may be found here.

To see all the business topics we have covered in the past click here.


Sunday, January 30, 2011

A sneak peek at my Valentine's Day project

Here is one of the things I have been working on over the past few days. I love pink and felt so when I came across this, making a pink garland, using felt letters and hearts made so much sense!!!

I hope I can get it done in time for Valentine's Day!

I used MS Word to get the pattern for the letters; the font is called Cooper Black and it comes with the software (I have MS Office 2007). I used 500 as the font size and chose to print the outline of the letters in order to save some money in ink cartridges (if you have MS Office 2007, highlight the letters, right click, font, effects - outline, enter).


What about you? What kind of cool projects are you currently working on?

Sunday, January 23, 2011

Luggage tags

Hello everyone! How have you been?

This week was absolutely crazy. So many new clients. It seems everyone's New Year's resolution this year is to file taxes on time.

I am however glad that I got to spend some time sewing and making new jars today.I feel so refreshed!

Remember when I blogged about luggage tags? I made these and gave them to my brother and his wife for Christmas. They will be traveling in a little less than 2 months, so I am sure they will come in handy. These tags look better than using a bandana or a ribbon to identify your luggage, don't you think? And they are super easy to make, even a beginner can finish each tag in about 30 minutes tops.

http://www.joann.com/joann/catalog/projectdetail.jsp?projectFlag=true&CATID=cat13851&fullPath=sewing+%26+embroidery&PRODID=xprd1057038&subCatName=sewing+%26+embroidery

I found the tutorial at Joann's website, but ended up modifying it a bit. I used fabric instead of ribbon. Looking back, I think I should have used a layer of batting between the layers of fabric, to make it a bit sturdier. But oh well, live and learn right?

You can download the step by step instructions, in .PDF format here.

And here is how mine turned out:

I had to block their address...


Saturday, December 11, 2010

More DIY holiday decor ideas

This week was a bit rough around here. Hubby was laid off and I had all 4 of my wisdom teeth extracted. Ouch! The good news is hubby is in really good spirits and we truly believe that when a door closes two more open. Funny enough, this happened a day before my surgery and I must admit that I have never been so pampered in my entire life. He makes a great male nurse and I am loving every minute of it.

I came across two beautiful and super easy holiday tutorials this week and I wanted to share them with you. I have not had a chance to try making these just yet, so let me know how it goes.

The first one is a Christmas wreath, by Tania Willis of whatchu talkin bout willis? Tania is an amazing scrapbooking artist as well as super mom.

                                           Source: Tania's blog

For step by step directions, click here.

The other tutorial I came across this week was made by Monica Ewing from the Crafty Nest. Monica is a web designer and a crafter.

                                                     Source: Crafty Nest

Find the tutorial here.

Have an amazing weekend everyone!

Sunday, December 5, 2010

Tutorial: holiday/winter DIY centerpiece

Hello Ooh Leela friends! I know it has been a while since I last "saw" you, but this past week was absolutely crazy! Work was extremely demanding and I have a huge to-do list: more tutorials and material for the blog, I have been working on some nice projects for Ooh Leela's Etsy shop, I need to increase traffic to the shop, holiday shopping, etc etc.

I read a few blogs on a daily basis and it seems that everyone is on the same boat as far as to-do lists go. If you have any survival tips, PLEASE share (can you read the desperation?).

I don't know about you, but hubby and I always end up overspending during the holidays. We were at Costco last week and hubby wanted to buy me some flowers (isn't he SO sweet?), but I had an idea I had wanted to try for a few years and since we had already spent way more than our budget allowed, I said no.

I put this centerpiece together the other day and he loved it! He thought it was the coolest thing ever! So did my mom and friends. And the best part? It did not cost us a thing! And it makes such a huge impact!

Tutorial: DIY holiday/winter centerpiece

Material list:


Red maple tree leaves or any red leaves you manage to find in your yard
Pine cones (smaller ones are better): this can also come from your backyard
1 tall vase
Tree branches: I got mine at Michael's a few years ago

Directions:

1. Clean your vase, and add the pine cones to the bottom (appr. 1/4 of the vase).

2. Arrange the red leaves nicely, so that the red part actually shows. Mixing smaller and bigger leaves works really well.

3. Play with the branches. See what works best.

4. I chose to display a couple of candles on both sides of the vase because I think they compliment the design quite nicely.


And because the leaves are red, you can leave this up until Christmas. The only thing I would change is the candles. Perhaps use red candles, or Santa/Frosty? 

Next up: Christmas baskets, decor and chair covers. A MUST see.

Friday, November 26, 2010

Tutorial: learning the basics of cross stitching

As promised, here is a step-by-step guide to cross-stitching. Enjoy! 

In case you missed the free pattern the other day, click here.

Material list:
  • Embroidery floss: DMC and Anchor are the most popular brands. This is your project, so you get to pick the color you want to use. I would recommend a deep red or fuchsia. Floss has 6 strands, but we will only use 2 in this particular project.  
  • Fabric: there are different materials in different colors available. We will use a small piece of 14-count Aida fabric and we should choose a color that works well with the colors chosen for the design. I think white or ivory would be best.
  • Needle: 1 tapestry needle, size 24
  • Scissors
Instructions:

1. Print the pattern I shared earlier this week. This particular graph has colors. Some graphs have symbols. Each symbol represents a color. 

2. Count the little squares. The pattern above is 9 squares wide by 9 squares long. Find the perfect place for your pattern on the fabric you are using. In the photo below, I chose to leave 3 squares on the right side and 2 squares at the bottom. You may choose to mark the area you will stitch with needles (like I did), floss, taylor's chalk or a marking pen. 


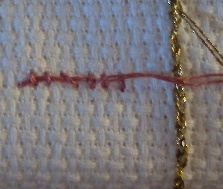
3. Thread the needle with 2 strands of floss. Do not pull both ends so that they are even with each other; instead leave a small tail at the end, close to the eye of the needles. Also, do not tie the ends into a knot. The idea is to make the back of the design look as professional as the front. 

4. As shown in the pictures below, place your needle behind the fabric and insert the needle into a hole. Hold the longer tail behind your fabric and stitch over this tail while you make the next several stitches.


5. Cross stitching is a combination of // and \\. Always stitch in the same direction. For instance, we will stitch from left to right. So, according to the pattern, we will go /// skip one ///. Then, we will go back doing the same thing, but from right to left: \\\ skip one \\\. The important thing is to always make sure the stitches face the same direction, which in our case is /// then \\\.

 
6. Consistent tension is key. You don't want loose stitches, but you don't want tight stitches either. They should be flat against the fabric. 

7. Finishing your work: once again, remember: we don't use knots. Once you have finished stitching, weave your needle through the existing stitches and use a pair of scissors to cut the ends. 


And VOILA! Our beautiful heart is ready! This particular one will become a hand towel, and it will be a Christmas gift to my husband's grandma!


If you have any questions, please post a comment and let me know. I will be happy to answer any questions you may have. 

BTW: how was your Thanksgiving? Mine was wonderful, full of family, good friends and delicious food.  
Speaking of wonderful, I have just finished some wonderful dish towels. I will be posting them in my Etsy shop tonight. Be sure to check them out and tell me what you think.

Have a great weekend!