home about me tutorials business tips ruff ruff shop flickr pinterest twitter facebook
Showing posts with label business tips. Show all posts

Thursday, July 12, 2012

Business Tips: how to create a blog button using PicMonkey


First and foremost, you will need to figure out how large/small you want your blog button/badge to be. If you are going to display it on your blog, make sure that it is not wider than your sidebar width. I won't get into how to determine the size of your sidebar, because that varies from platform to platform. For the purposes of this tutorial, let's go with what I use on my blog, which is 200x100.

Open PicMonkey. Click on Create a Collage:


Go to layout:


Click on ducks in a row


Choose the 2 cell layout, and delete one of the cells.


Unlock proportions (padlock sign) and enter 200x100.


Click on the color palette to edit the background color. Save file.


Go back to PicMonkey. Click on edit a photo.


Upload the "collage" you have just created. Using PicMonkey's photo editing tools, you can add text, texture, shapes, borders:


And even insert your own picture (click on shapes - see above, then on "YOUR OWN"):


And VOILA: your very own blog button. Both the text and dog paws were created using PicMonkey's tools. I inserted Ooh Leela!'s logo using the "add your own picture" feature.

Can't wait to see what you come up with :)

Wanna add Leela's face to your blog? Use the HTML code below.


Adapted from one of Kelly Designs' original tutorials. Original file may be found here.

To see all the business topics we have covered in the past click here.


Friday, February 24, 2012

Business Tips: understanding product cost and learning how to price handmade products - part 2


Thank you so much for the amazing feedback all of you provided last week! If you missed part 1 of this series, you can find it here

Before we dive into pricing, I thought it would be interesting to address some of the questions that have come up since our discussion last week.

Q: I am ok with using my profit margin to "pay" myself, instead of adding an additional expense line item, aka labor costs. 
A: Technically, a portion of your profit margin should be used to pay for your overhead costs, such as utilities, marketing expenses, and other general and administrative expenses. The other portion (aka net profit or whatever is left after all your expenses have been paid), should be reinvested into the business to allow for future growth: perhaps you would like to upgrade your sewing machine, or buy fabric in bulk?
In addition, if you expect your business to grow, one day you may no longer be able to keep up with the demand for your products (yay!). Such a good problem to have, right?!? This means you will need to hire help, and it is important to pay people, or else they may not come back the next day ;) You can't simply increase your prices when you hire help, so it is important to factor in labor costs, even though at the moment you may only be a one-woman shop. 

Q: Do you have any tips on how to keep track of how much time I am investing in each one of my items? 
A: I have done a lot of research on this, and I came across a really great time keeping toll, called Toggl. Toggl offers a free 30-day trial and as long as you cancel your subscription before your trial period is up, you will not be charged. You can track time online, on your desktop (PC or Mac), iPad, iPhone, and Android phone. They also have a start and stop watch, and as long as you press "start" when you start working on something and "stop" when you are finished, the system calculates the amount of time you spent on each task, which to me is a big plus because I don't have to deal with fraction of hours, converting minutes to hours and vice versa. 

**I am not being compensated for suggesting Toggl. All opinions are 100% my own, based on what has worked for me.

Now let's talk about pricing, shall we?

Pricing is Marketing!

The way you price your product determines how people will perceive it.  A lower price, does not always mean more sales. In my experience, and based on the feedback I've received (wink wink, thank you!), if you price something too low, that may imply that you used inferior materials and that you are not an expert in your field. 

People who charge more may sell less items, but the higher profit margin will more than make up for it. Plus who doesn't want to work less and make more moola? Repeat after me.... I want to work less and make more moola. 

Pricing is very subjective, but the most common formula is:


Let's take the coffee sleeve example we used last week: 

Cost: $16.74
Now multiply that by 2: $33.48 --> Wholesale price
Multiply the wholesale price by 2 again: $66.96 --> Retail price

Say what?!?

Pretty crazy, right? If I do a quick search on Etsy, there are coffee sleeves selling for as little as $6.00 (granted, they are not appliquéd), but still, a coffee sleeve for $67 buckaroos? 

Give me a minute while I get over this self induced sticker shock.


This means:

1. Handcrafted items are usually underpriced, and that hurts all of us who are trying to make a living 

2. I may need to lower my raw materials cost and/or streamline my process

3. In the long run, coffee sleeves may not be a sustainable product, if I want to run my shop as a business

4. I am perhaps targeting the wrong audience. I am not always my target customer and can't price something based on what I can afford to pay. People buying my products may have more disposable income

5. You will still find coffee sleeves going for $15.99 in my shop. Does that make me a hypocrite? Maybe...Once they are gone, they will be gone for good though. 

                                                  Source: inkandspindle.blogspot.com via Ooh on Pinterest


Are there any other pricing formulas, you ask?

Yes, you can always play around with the markup percentage, both from cost to wholesale and from wholesale to retail. Multiplying it by 2 (per example above) = 100% markup percentage.

Before you go there however, if you wish to sell your items wholesale (and you should always consider doing that, if you want to grow and expand your business), you should know that retail shops will almost always want to make a 100% markup on the products they sell. This means that if they buy your item for X, they will want to sell it for 2X (consistent with the formula above). 

The problem may only arise when their price is higher than your retail price. For instance, say that you sold something to a brick and mortar store for $20.00. They will want to sell it for $40.00 (2X or 100% markup). You may be selling that same item for $35.00 in your shop. The retailer may not be happy about that and this is something you should keep in mind. 

As promised, I've updated the spreadsheet I put together last week and included a tab for pricing. Feel free to download it to your computer and play with the percentages (cells highlighted in pink). See what works for you. I'd love to hear your thoughts. 

As always, please contact me at oohleela{at}gmail{dot}com in case you have any questions.

Happy Friday!

Thursday, February 16, 2012

Business Tips: understanding product cost and learning how to price handmade products - part 1


Let me start by saying that everyone who is trying to become a full-time, successful indie biz owner should read this. Hey, even people who sell handcrafted items as a hobby should read this. 

When I was starting out, I let my emotions get the best of me. I always put my heart and soul into every one of my pieces so I thought, hey I love this, people will most certainly love it too! There will be a market for it! This is what I'd pay for something like this, so let's price it at "X". 

That was one of the biggest mistakes I've made. Not only did I not understand how much it cost to make each one of my products, I did not even consider my time. How can one be a full-time business owner if one does not pay herself? What was I thinking? Very embarrassing to even admit this, considering I have a business background. 

While it is important to sell something that you are passionate about, if you are going to treat your little shop as a business, it is important to know whether or not that item is cost effective to make. You should be asking yourself questions such as: How much does it cost? After I factor in my labor costs as well as my profit margin, will people still want to buy it? Mostly importantly, you need to be able to answer these questions. 

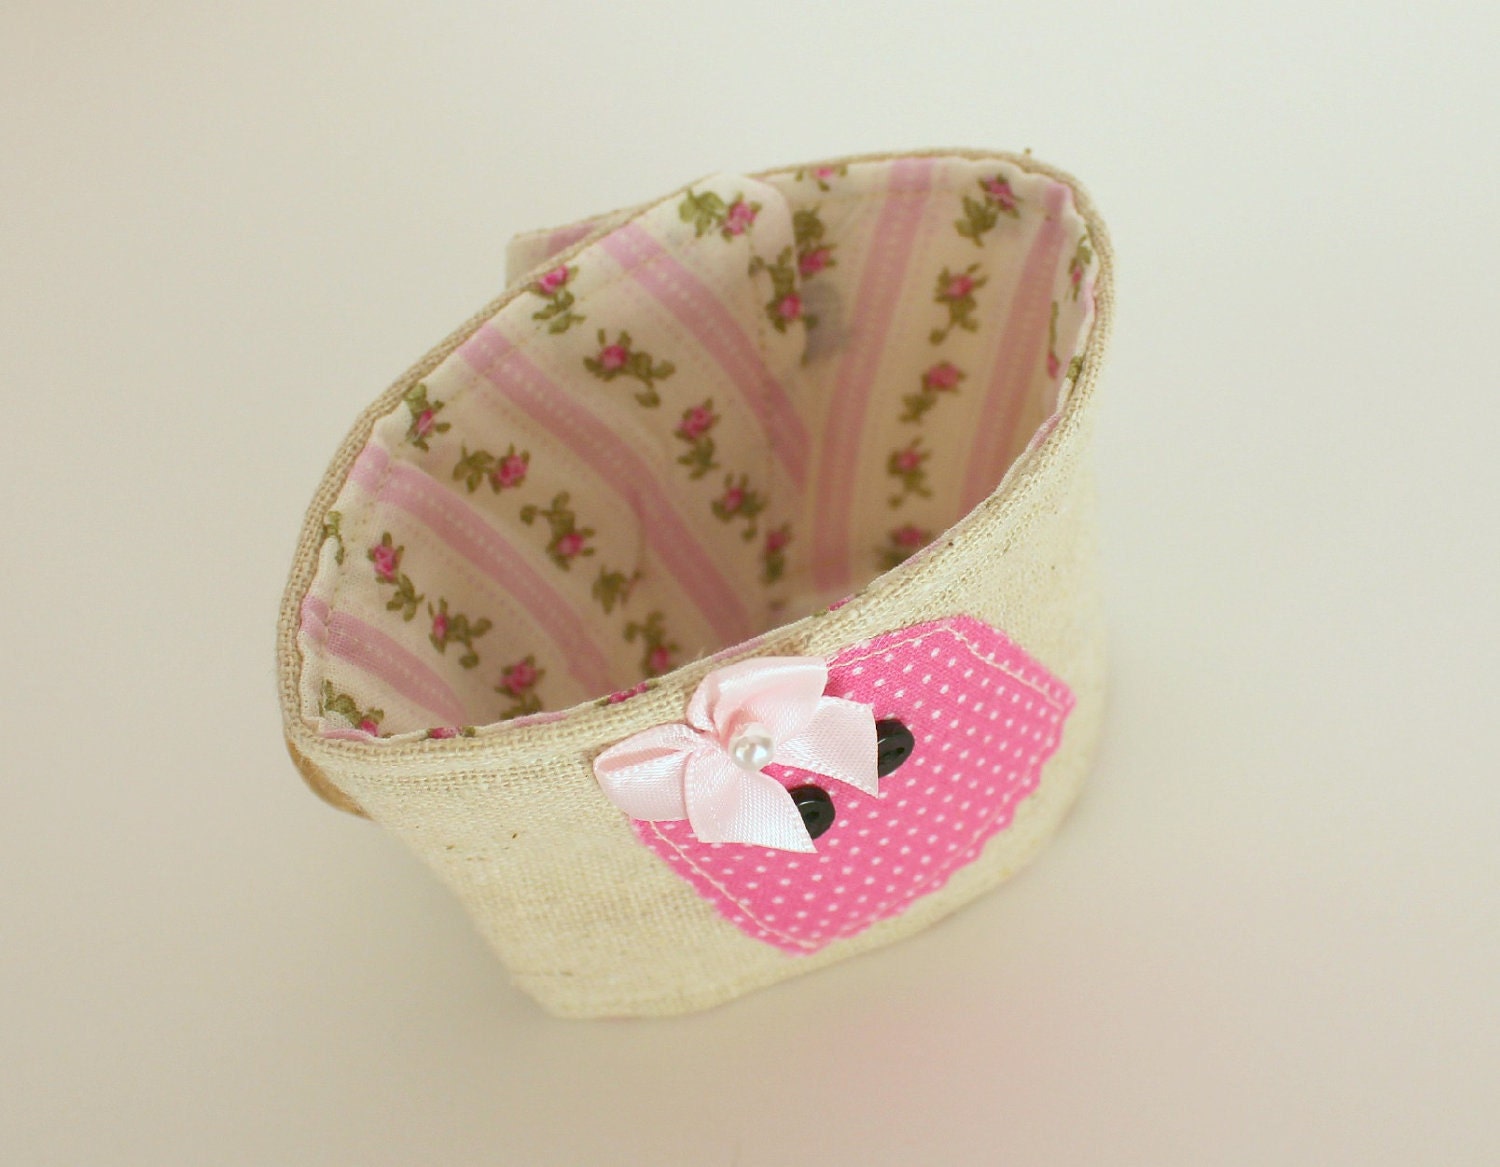
There are so many things one must consider when costing out their items. Let's take one of my appliqué  coffee sleeves for instance: 

Pumpkin spice latte coffee sleeve

I am extremely passionate about them and I LOVE making them! Right now they go for $15.99 each (I have recently increased the price, they were $12.99 each all throughout last year)

What exactly do I need to consider?

via

Materials cost: we are talking about the cost of any raw materials you use to make your product. In this case it includes the outside fabric, lining fabric, appliqué fabric, fusible web, batting, elastic and button. Based on my calculations, the total comes to $3.00. 

**If you have coupons, it is important to consider the cost as if you did not have a coupon. Depending on the demand for your product, you may have to buy more materials at a time when coupons are not available. So go with the worst case scenario. 

**If you buy your materials online, you need to include the shipping costs as well. 

Total materials cost: $3.00

Equipment cost: I am using a sewing machine, that requires periodic tune ups and TLC, as well as needle and thread, right? So based on the amount of sewing I do, I figure I will add $0.10 to each item I make, to cover these costs. 

Total equipment cost: $0.10


                                                   Source: joyshope.com via Timalee Sue on Pinterest


Labor cost: You need to make a living and deserve to be paid way more than corporate giants pay their employees overseas. Do not undersell yourself. For the purposes of this exercise, I am going to use $10/hr. as my hourly rate. Now, $10/hr. translates into a $20,000/year salary, or $1,666.67/month before taxes. $10/hr. is less than the minimum wage in the San Francisco Area.  

**If you are having a hard time deciding how much money you should pay yourself, check out this hourly rate calculator.

It takes me about an hour to cut my fabric and batting, hand cut and apply my appliqués and finish the sleeve, provided I do everything assembly style. This also includes taking pictures, editing them, listing the sleeve and marketing it on various social media sites. So let's add $10 to the mix, to cover my labor costs. 

Total labor cost: $10.00

Listing fees: although it would be nice to sell an item as soon as you list it, it doesn't always happen that way. Based on my experience, I need to re-list an item anywhere between 3-7 times before it sells. That is an average of 5 times/item. Etsy charges me $0.20 every time I list/re-list an item, so we need to add $1.00 to the cost of the sleeve. 

Total listing fees: $1.00

Etsy and PayPal fees: every time an item sells, Etsy charges me 3.5% of the sale price, not including shipping. So for an item that sells for $15.99, 3.5% comes to $0.56. PayPal on the other hand, charges me 2.9% of the total price (item + shipping) to process payments. Say shipping is $2.00; 2.9% of $17.99 comes to $0.53. They also charge me $0.30 per transaction. So between Etsy and PayPal fees, we need to add $1.39 to the overall cost. 

Total Etsy and PayPal fees: $1.39


                                                    Source: decor8blog.com via Isadora on Pinterest


Packaging supplies: this includes shipping labels, printer ink, envelopes, tape, tissue paper and in my case raffia. If I buy them in bulk, I am paying about $0.50 per item that I sell. 

Total packaging supplies: $0.50

Marketing materials: I also like to add my own label as well as a nice tag and a business card with each one of my products: I will show you how I arrived at this figure when I post about how I order my labels, tags and business cards, but for now, believe me when I say that the total cost comes to about $0.75 per item sold.

 Total marketing materials: $0.75

Let's recap:

Materials cost
$3.00
Equipment cost
$0.10
Labor
$10.00
Listing fee
$1.00
Etsy and PayPal fees
$1.39
Packaging supplies
$0.50
Marketing materials
$0.75
Total cost
$16.74


Do you see what I see?!? So far my cost alone (without a profit) exceeds my price! Some of you may argue that a profit is not necessary when you are already factoring in your labor costs. Wrong! How do you expect to pay for all your fixed costs/overhead, such as rent, utilities, CPA costs, etc, if you don't make a profit? 

I also donate a portion of my sales to various causes throughout the year. Yikes! It gets scarier by the minute, doesn't it?

Everyone with me so far? 

I just about died when I realized that I am practically paying my customers to buy my coffee sleeves. 

Boo, the girly ghost
Is that the case for you too? 

What does that mean (to me)? That although I love making coffee sleeves, at their current price, they are not getting me any closer to my goal of quitting my day job and becoming a full time business owner. Does that mean I can't/won't sell coffee sleeves in the future? Hmmm, probably not (there are a few left in my shop, still going for $15.99). But I feel empowered because I know that I am required to change directions (raise my price - provided there is a market for it at that price point - or focus on other products, that have higher profit margins) if I still want to achieve my goal. 

I wanted to go into pricing strategies, but I figured it would be too much for one post so I decided to break it into 2 parts. We will cover that next week. 

I have prepared a spreadsheet to help you figure out what your product cost is (told ya I was a spreadsheet kind of gal - wink!). Simply enter your numbers in the pink cells, and the rest is calculated automatically for you. It is a Google spreadsheet, and you can access it even if you don't have a Gmail account. You can also download it to your computer if you would like. You may access it by clicking here

**Edited to add: you will need to download the file in order to populate the spreadsheet with your own numbers. To do this, click on file, then on download as, excel. Or email me and I will send you a copy by email.

Again, I'd love to hear your thoughts on this, as well as any other topics you would like to see covered in the next few weeks. 

Please email me at oohleela{at}gmail{dot}com in case you have any questions!

Happy costing friends!

To see all the business topics we have covered in the past click here.

Wednesday, February 8, 2012

Business Tips: how to create a Facebook page vanity url for your business


Yay for a new blog series! Starting a handmade business is hard. Running a business is tough. I've been there and done that. I am the type of person who researches everything, writes it all down (spreadsheet style), and then stares at it for what it seems like days before I make a decision. I'd like to think of myself as a risk taker, but truth be told, I prefer to weigh all the pros and all the cons before I make a decision. 

Over the past year and a half (since I started Ooh Leela!), I've collected so much information that I thought it would be fun to share it with you guys. I hope that this helps you. I am by no means an expert, so use it at your own risk ;)

When I created a Facebook page for Ooh Leela! it looked something like this: http://www.facebook.com/pages/Ooh-Leela/176886285657017

It. drove. me. nuts! All I wanted was a simple, customized 'facebook.com/oohleela' address. To me it just adds a bit of professionalism to my brand.

At first I thought it had something to do with the type of business page I had selected (you know how Facebook asks you to select what kind of business you have when you first create a page?).... Nope, it wasn't it. 

So after completely giving up on it for months (I even stopped mentioning it on my business card because there was not enough space to add all of those numbers), I decided to look for a solution.

So, I remembered to ask my friend Mr. Google for help. It turns out that such a thing is called a "vanity url." Fancy, yes?

Do you want to know how to create your own Facebook page vanity url? Here are the steps!

1. Log in to your Facebook account

2. Create a Facebook page for your business (please let me know if you'd be interested in a step-by-step tutorial and I will be happy to put it together)

3. Go to http://www.facebook.com/username/

4. Go to 'page name' (see arrow below) and choose your page.


5. Choose a name, make sure it is available, and you are all set! 

**Now, pick a name that you will be happy with for there is no going back friends; once you pick a name, for instance www.facebook.com/THENAMEYOUPICKGOESHERE, it cannot be changed. 

Leave me a comment or email me at oohleela {at} gmail {dot} com in case you have any questions!

What sort of business questions have you been faced with lately? How do you use/plan to use your Facebook page? To announce new releases? Sales? Coupons? I'd love to hear from you!

Sunday, February 13, 2011

Business tip: Picnik

Selling online and on Etsy is fairly new to me. It feels so good (and it makes me feel so alive) to be able to learn something totally new everyday. But excitement aside, I am not going to lie: it has been quite a challenge, so I thought it would be helpful if I shared some of my struggles and tips from time to time.

Taking quality, professional looking pictures has been a big stumbling block to me. I took a photography course in college, but back then all I was interested in was taking pictures of my puppies while having fun. Never did I think that I would actually be using such a skill in my life.

I don't currently own a fancy camera. In fact my point and shoot camera is about 8 years old. I am just making do until I can put some money aside to buy a more appropriate (and expensive - yikes) DSLR camera. Which means I have had to rely on photo imaging software to come up with (somewhat) decent looking photos. BUT, photo imaging software is a foreign concept to me.

Yesterday however I came across picnik.com. Picnik enables you to edit your photos online, at the click of a button (or 2). It is super user friendly and intuitive, unlike Adobe Photoshop. And best of all it is free (and I always say if it is free is is for me).

Here is what my picture looked liked before I used picnik.com:


 And here is the after:


Better, yes? If you have any tips you would like to share, I would love to hear from you! Have a great week!