

As promised, here is a step-by-step guide to cross-stitching. Enjoy!
In case you missed the free pattern the other day, click here.
Material list:
- Embroidery floss: DMC and Anchor are the most popular brands. This is your project, so you get to pick the color you want to use. I would recommend a deep red or fuchsia. Floss has 6 strands, but we will only use 2 in this particular project.
- Fabric: there are different materials in different colors available. We will use a small piece of 14-count Aida fabric and we should choose a color that works well with the colors chosen for the design. I think white or ivory would be best.
- Needle: 1 tapestry needle, size 24
- Scissors
Instructions:
1. Print the pattern I shared earlier this week. This particular graph has colors. Some graphs have symbols. Each symbol represents a color.

2. Count the little squares. The pattern above is 9 squares wide by 9 squares long. Find the perfect place for your pattern on the fabric you are using. In the photo below, I chose to leave 3 squares on the right side and 2 squares at the bottom. You may choose to mark the area you will stitch with needles (like I did), floss, taylor's chalk or a marking pen.

3. Thread the needle with 2 strands of floss. Do not pull both ends so that they are even with each other; instead leave a small tail at the end, close to the eye of the needles. Also, do not tie the ends into a knot. The idea is to make the back of the design look as professional as the front.
4. As shown in the pictures below, place your needle behind the fabric and insert the needle into a hole. Hold the longer tail behind your fabric and stitch over this tail while you make the next several stitches.

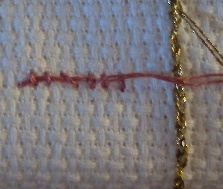
5. Cross stitching is a combination of // and \\. Always stitch in the same direction. For instance, we will stitch from left to right. So, according to the pattern, we will go /// skip one ///. Then, we will go back doing the same thing, but from right to left: \\\ skip one \\\. The important thing is to always make sure the stitches face the same direction, which in our case is /// then \\\.

6. Consistent tension is key. You don't want loose stitches, but you don't want tight stitches either. They should be flat against the fabric.
7. Finishing your work: once again, remember: we don't use knots. Once you have finished stitching, weave your needle through the existing stitches and use a pair of scissors to cut the ends.


And VOILA! Our beautiful heart is ready! This particular one will become a hand towel, and it will be a Christmas gift to my husband's grandma!

If you have any questions, please post a comment and let me know. I will be happy to answer any questions you may have.
BTW: how was your Thanksgiving? Mine was wonderful, full of family, good friends and delicious food.
Speaking of wonderful, I have just finished some wonderful dish towels. I will be posting them in my Etsy shop tonight. Be sure to check them out and tell me what you think.
Have a great weekend!
No comments:
Post a Comment
I love hearing from you! Thank you so much for taking the time to leave me a comment. Have a wonderful day!!!